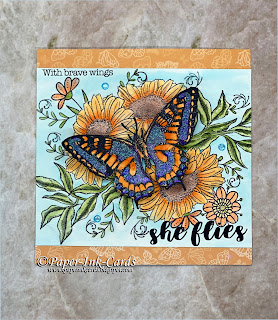
 One of my favorite things to do in cardmaking is to stamp my own floral arrangements like I have done on today's cards.
I love to mix and match individual floral and foliage stamps to create a layout for the focal point of my cards. It is so satisfying and no matter how many times I use the same images each composition is always unique.
The secret of being able to build bouquets like these is masking, a basic stamping technique that will make your work look like art. Masking lets you layer stamped images over each other creating depth to your design. In this case it will appear that there are flowers and leaves in the background as well as the foreground.
Step-by-Step Tutorial
What you will need are some images of your choice, masking paper, scrap paper or Post-It Notes, scissors, temporary glue, stamping ink, stamping block or stamp press and cardstock.Begin by stamping the first of your largest images onto your cardstock and then without re-inking, stamp that same image onto your scrap paper. There should be plenty of ink still on your stamp for this. Now fussy cut out the image stamped on the scrap paper, getting as close to the outline as possible. Add some removable glue or tape to the back and lay it over top of the image on your card making sure the image is completely covered. This is where masking paper or Post-It Notes come in handy, they are already sticky. If you use a regular Post-It Note be sure that you stamp part of your image up near the edge where the sticky is on the back. You can also find all over sticky Post-It's that work really well for masking. Another masking option is to use masking fluid but it takes time to dry so I like using paper masks.
Next stamp another image or the same image allowing part of it to be stamped over the mask. Now remove your mask and see how the second image appears to be behind the first. Cool huh?
Continue to do this with all of the elements that you want in your bouquet building up and around your original image. In the cards above I used two or three of the same large floral images first then I added smaller flowers and foliage to fill in and complete the arrangement. For the butterfly card, I made two masks of the sunflower so I could stamp the foliage between them and in the second card I created just one mask and moved it around between the two mums as needed. Use as many masks as you want and when you are done, save them with your stamp set to use the next time. I typically reuse masks several times before I toss them out and create new ones.
Learning how to mask can open up a whole new love of stamping. Give it a try, with just a little practice you'll be creating all sorts of scenes and using your stamps in ways you never thought possible.
Thank you for visiting,
Dawn
All products used are my own and purchased by me. My blog posts, videos and opinions are not sponsored, and I am not paid by the product companies to create these posts and videos.


Hi, Thanks for sharing this excellent Blog with us.Keep doing good work.
ReplyDelete